Other
Everything else until we make a category for it.
92 files
-

*Dual-Lightguns fix* Mame 64 bit 0.176
By sevenseal
Personal no nag patch + Patch with pitou's fix for dual lightguns
----------SETTINGS--------
joystick 1
lightgun 1
multimouse 1
offscreen_reload 1
lightgun_device lightgun
lightgun provider = auto
595 downloads
0 comments
Updated
-
0 comments
Updated
-
Arcade64 0.177 *Reborn Mameuifx*
By sevenseal
first release of the project thanks to Robert for continuing where Mamesick has left off. Mamesick is not gone but just not greatly active
this has my personal patching for no nag
321 downloads
0 comments
Submitted
-
Arcade64 0.179 no nag
By sevenseal
not my personal compiled, but here is one from Insertmorecoin, enjoy and thank him if you know him
I will compiled the next release with my own edit of Arcade64, so until next time!
hope thing get resolve soon
112 downloads
0 comments
Submitted
-
0 comments
Submitted
-
0 comments
Submitted
-
0 comments
Submitted
-
Arcade64 no nag 0.186
By sevenseal
personal patch of no nag arcade64 0.186
PS: lol how come no one remind me to compilied this, lmao i have a busy schedule reminder are helpful...
178 downloads
0 comments
Submitted
-
0 comments
Submitted
-
0 comments
Submitted
-
0 comments
Submitted
-
Arcade64 no-nag patch
By sevenseal
Arcade64 no-nag patch 0.178
copy over to mame 0.178 install then run arcade64
339 downloads
0 comments
Updated
-
Atari 2600 Database No Adult Games
By Elfhuo
This Is a Database for the Atari 2600 But no Adult Games
31 downloads
0 comments
Updated
-
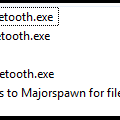
Bluetooth Enable/Disable Scripts for Taito Type X
By zerojay
Small scripts used for disabling and reenabling Bluetooth when running Taito Type X games to avoid problems caused by having Bluetooth enabled.
228 downloads
0 comments
Submitted
-
CLR Mame Pro
By HyperSpin
What CLRMame does is to check all of the individual rom files against a data file to make sure that they have the right information in them when you update mame
Tutorial also found here http://mame.3feetund...ck-start-guide/
Start CLRMAMEPRO
Read the welcome message dialog, then click "OK"
Click "Create..."
Click "..." next to filename and find your mame exe
Type a description like "MAME0138"
Click "Create Profile"
Click "OK"
select the new profile that you created
click "Load / Update"
Click "OK" and wait a while
Click "OK to All" or "Yes to All" on any window that pops up
Now you're at the main window
Click "Settings"
Click "Add" to add a ROM path
Browse to your MAME roms folder and click "OK"
It should now look like this with your ROM path
In the drop-down, pick "Sample-Paths"
Click "Add" to add a Sample path
Browse to your MAME samples folder and click "OK"
It should now look like this with your sample path
Click the X in the corner to close this window
Now you're at the main window again
Click "Scanner"
Click "New Scan" to scan your current MAME roms
If you get a popup about an empty samples folder, just click ok
Here's the statistics window
Click "OK" to close this window when you're done looking at it
Here's the results window, with one of the incomplete sets opened up so we can see what files are missing
Click the "+" button under "Fix", then click "New Scan" again
If you get popups, click "Yes To All"
Here's the statistics window after we fixed some problems
Click "OK" to close this window when you're done looking at it
To rebuild your rom set when adding new files, use the rebuilder from the main window
Select the source of the new files that you want to rebuild into your current set
Click "Rebuild"
This is useful when you have a set for an old version of MAME that you want to rebuild for a newer version of MAME
Here's the statistics screen from the rebuilding process
Armed with the knowledge above, you should be able to rebuild and scan/fix your MAME set.
147 downloads
0 comments
Submitted
-
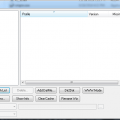
Controller Mapper for JoyToKey
By retango
Hi!
I share here an Excel tool I made that helps creating JoyToKey config files for different systems. With this tool, you can configure JoyToKey profiles for up to 12 systems and 6 pairs of physical controllers for each system. It semi-automates the process, preparing the text for the cfg files.
I have a cab with 2 Ultimarc U360s (each one as a joystick with 8 buttons), and I also have several retro usb controllers that I use with different emulated systems. This tool helped a lot in the tedious process of making the JoyToKey profiles for all the possible combinations of controllers - system.
I attach in this post the instructions (also copied below), an example file in pdf, the actual Excel file (zipped), and the JoyToKey profiles and RetroArch config files that I use in the example.
I hope you find it useful, please feel free to use it, improve or re-distribute it.
Regards,
ReTango
PS: the spreadsheet is initially protected so you can only enter data in the allowed cells, you can unprotect in the Review pane, it has no password.
Instructions
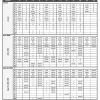
With this spreadsheet, you can configure JoyToKey profiles for up to 12 systems and 6 pairs of physical controllers.
Step 1: Configure Key bindings for each "System"
First you should configure each emulated system, you can configure up to 12 systems.
In the "Main" worksheet, between rows 1 and 27, you must complete 3 columns for each system.
On the light gray column, you must specify which "Emulated Buttons" the system uses, and name them. On the Player 1 and 2 columns, you must enter which "Key" binds to each Emulated Button for players 1 and 2 in the selected System.
E.g., for NES you need the Pad plus buttons "B", "A", "Select" and "Start". First enter the names of each "Emulated Button" on the light gray column (in this case, I chose "B", "A", "Select" and "Start"). Then enter which "Key" corresponds to each "Emulated Button" for each player in your designed emulator, for example in Retroarch in my case.
The "Keys" you enter should match one of the available standard Windows keys, which you can find in the "Key Codes" worksheet. If you enter a "Key" that is not found, the cell will turn red. Look into "Key Codes" for the names I chose for each key.
Step 2: Configure each "Physical Controller"
Next you should configure each "Physical Controller", up to 6, in the "Main" worksheet, between columns A and D, rows 28 to 100.
In my case I use Ultimarc's U360s with 8 buttons each for my arcade cabinet, Logitech F710, and some RetroLink imitation controllers and adapters.
For each controller, you should name each "Physical Button" in column C, and enter in column D which actual button number it is. You can configure up to 10 buttons for each controller (plus the Pad), numbers 1 to 10. (Sorry if you need more!)
To find out which number corresponds to each Physical Button, plug your controller, go to "Set up USB Game Controllers" in Windows, select the controller and go to "Properties". You should get to the window you see on the right. Then press each button and see which number lights up in this window.
Here you can also optionally chose a button for each physical controller that will always work as "Escape" (in all systems) when pressed for more than half a second. You enter the "Escape button" number to the right of the controller name, on column D. Leave it blank if you do not want to use this feature.
Each physical controller will use 2 Joystick tabs in JoyToKey, always the same number in all the system. In order for this to work, you should map each Physical controller to a Joystick Number in JoyToKey. With your joystick/s plugged, in JoyToKey got to "Settings", "Configure Joysticks", "2.Advanced Setting for each device". Then select your plugged joystick in "Please select a device", and "Specify a preferred number when this device is connected". Now JoyToKey will always assign the selected Joystick number when this device is selected. (This is stored in the JoyToKey.ini file)
Step 3: Map each "Physical button" to each "Emulated Button"
You then need to map each "Physical Button" of each "Physical Controller", to the different "Emulated Buttons" in each system. (the direction Pads are always mapped to the same keys)
This is done between columns E and AN, rows 28 to 100. For each "System"-"Physical Controller" pair, you need to complete only the light gray column: enter the name of the "Emulated Button" that is assigned to each "Physical Button". The Keys the correspond to that Emulated Button are completed automatically.
Step 4: Create the .cfg files.
When you are finished mapping, you have to create the JoyToKey .cfg file for each system. This is a semi-automatic method.
With RocketLauncherUI, create an empty JoyToKey Profile for each system (or emulator), and locate the file .cfg it creates. Then go the "JoyToKey cfg" spreadsheet, enter the system number (1-12) in cell C1, select column A (go to cell A1, and press Ctrl+Shift+↓), and copy paste into your .cfg file.
Alternatively, you can print the "JoyToKey Maps" spreadsheet, and enter profiles manually.
Notes.
Works with JoyToKey v 5.7.
Spreadsheets are protected for your convenience. If you want to Unprotect them, just go to the Review Pane in Excel and press "Unprotect Sheet". There is no password.
3,842 downloads
0 comments
Updated
-
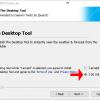
Daemon Tools Lite
By gigapig
Here you find version 10.2 of Daemon Tools Lite. Currently version 10.3 does not work with RocketLauncher.
Care must be taken when installing this product as the "Free" version as it will install other software onto your PC.
Please see the screen shots for the best way to install.
Remember to set your DT Lite path in RocketLauncher UI to "C:\Program Files\DAEMON Tools Lite\DTAgent.exe" or wherever you installed it.
2,120 downloads
Updated
-
Dat-O-Matic Dat File Parser
By Rain
Dat-O-Matic dat file parsing system which I created for a very special project that I am working on; I figured it would save some of the developers out there several hours of leg work creating their own. Currently it parses UTF/Text dat files found on http://datomatic.no-intro.org/ I plan on adding functionality of allowing it to parse XML/Text type DAT files at some point in time. Without further delay here is how you use this bad boy.
Include a reference
using DatProcessor;
Initialize the code
var myMethod = new DatFileProcessor();
var myGames = myMethod.ProcessFile(@"c:\path\to\my\datfile.dat");
This will read your DAT file into an object type that will be held much like a list type, and here is a quick and dirty way to loop through all of the data that can be found from that DAT file.
Looping through games
foreach (var myGame in myGames)
{
Console.WriteLine(myGame.Index);
Console.WriteLine(myGame.Name);
Console.WriteLine(myGame.RomCrc);
Console.WriteLine(myGame.RomMd5);
Console.WriteLine(myGame.RomName);
Console.WriteLine(myGame.RomSha);
Console.WriteLine(myGame.RomSize);
Console.WriteLine(myGame.Serial);
}
Overview - The Layout of a DAT
game (
name "Circus Attractions (Europe) (Compilation - Milestones)"
description "Circus Attractions (Europe) (Compilation - Milestones)"
rom ( name "Circus Attractions (Europe) (Compilation - Milestones).ipf" size 928295 crc 83BA36E2 md5 1B54BFAA5325EC1D654BF035299B0CCF sha1 516672412F3532F823088FD71A669D30E226D5CA )
)
Index - Stores the line number within the file where the game has been located
Name - Stores the proper name of the game found in line #2 above
RomCrc - Stores the CRC value of the rom found in line #3
RomSha - Stores the SHA1 value of the rom found in line #3
RomMd5 - Stores the MD5 value of the rom found in line #3
RomName - Stores the literal name of the rom found in line #3
RomSize - Stores the size of the current rom found in line #3
RomSerial - When applicable this will store the value of a games serial (typically found in line #3/#4)
Anyways ladies and gents, I just wanted to spread my works for any of our brilliant software developers out there who need a quick and simple way of parsing DAT files; I will add a searching algorithm in later as well. Thanks everyone!
94 downloads
0 comments
Submitted
-
Demul Xbox 360 Control Configs
By gigapig
Original thread
http://www.hyperspin-fe.com/topic/7830-demul-full-xbox-360-controls-for-naomi-and-atomiswave-enjoy/?hl=%2Bdemul+%2Bcontrol
Demul - Sega Naomi & Sammy Atomiswave control configs for Xbox 360 Controller
By urbangangsta101
Demu 0.582
Sammy Atomiswave XML v1.1
Sega Naomi XML v1.2
Installation: (Essential)
- Put the nvram folder into your Demul emulator folder (Overwrite any existing files)
- Put the Demul (v0.5.8).ini into your Hyperlaunch Demul module folder (Overwrite any existing file)
Extra Steps: (Not essential)
- Enable Keyboard in Port C of the Demul plugins menu (Config->Maple Device Manager->Port C = Keyboard) - For 'Keyboard' style games
- Add 'Mahjong' controls to your padDemul.ini (see demul-naomi-non-standard-controls.pdf)
- Map controls for the 4 'Trackball' style games using Xpadder (see demul-naomi-non-standard-controls.pdf)
- Map controls for the 11 'Lightgun' style games using Xpadder (see demul-naomi-non-standard-controls.pdf & demu-atomiswave.pdf) You should really use an Aimtrak Lightgun
- Map controls for 1 'Touch Screen' style game using Xpadder (see demul-naomi-non-standard-controls.pdf)
Enjoy!
738 downloads
0 comments
Updated
-
EmuMovies DSU
By Circo
http://emumovies.com...-emumovies-dsu/
What is this new download service?
The EmuMovies Download Service Utility completely automates the installation and use of all of our artwork packs and media in the front end of your choice. This means that instead of spending months of downloading, sorting and renaming it will now only take minutes per system (plus download time). The download service utility only downloads the content to match your roms and renames the content automatically to whatever romset you have so it just works!
Feature List
•Support for over 100 different systems
•Notifies you upon startup if any sets you have previously downloaded have been updated
•Allows you to only view those sets so you can easily update your artwork and video packs
•Downloads artwork to match your roms (only what you need to save space)
•Automatic renaming (requires no user input, artwork and videos will match your roms)
•Ability to individually download sets or all at once
•Tied into the EmuMovies member system (access is immediate)
•Limited mode for basic Members (All artwork packs supported, 250MB/day limit)
•Video Snap downloads for Supporting Members
•On the fly conversion to AVI for front ends that only support AVI format.
•Plus more!
Notes:•Your login is your site login for EmuMovies.com (not your ftp login)
Compatability:•Minimum OS Requirement Win XP SP3 (Vista or Later Recommended)
360 downloads
0 comments
Submitted
-
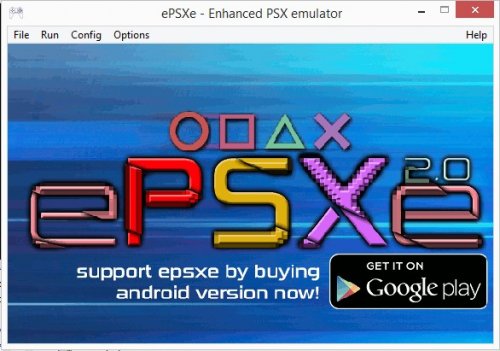
epsxe ahk for RL
By jfp
This is a roughly edited module for rocketlauncher to limit frameskip and use petes ogl driver v2.9 instead of core, win10 doesnt work with v2.05 of ePSXe and v2.01 runs at 1000+ fps without this.
Should be able to use any plugin by renaming it to "gpuPeteOpenGL2.dll"
493 downloads
- rocketlaucher
- module
- (and 5 more)
0 comments
Updated
-
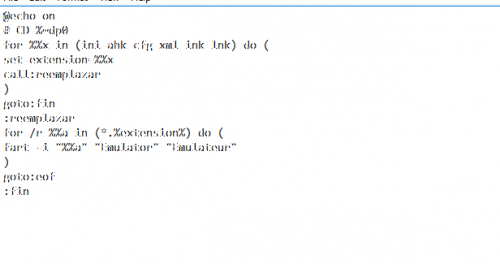
Fart File and replace text
By streetmedic
This will change any folder or text string that you want just edit at the end of the script what you want . So if your hyperspin contains a folder called Emulateur and you want that folder renamed add Emulator in the second example ..
@echo on
# CD %~dp0
for %%x in (ini ahk cfg xml ink lnk) do (
set extension=%%x
call:reemplazar
)
goto:fin
:reemplazar
for /r %%a in (*.%extension%) do (
fart -i "%%a" "Emulator" "Emulateur"
)
goto:eof
:fin
136 downloads
Submitted
-
Files 2 Folders Batch Program
By HyperSpin
I found this app online and works great for hyperlaunch aka rocket launch media. It works
great for stuff like manuals etc that have to be in their own "folder" and you cant just have the file names in the root. For instance instance in the manual folder of hyperlaunch say
you have 100 manuals. First you'll want to use fatmatch to match up the names of the manuals to your games. Once they have all been renamed properly and you have unzipped this, just
right click your mouse and select "files 2 folder", once clicked the document will create its own folder and place the document in there. If you chose to do all of your media, hold down ctrl or use shift to select them all and click "files 2 folders" by right clicking. This time you'll get a different option in the pop up. To get a folder for each file individually use the second option named move each file to indivudal subfolders based on their names. This makes managing hyperlaunch media a breeze with creating folders for your content
hyperspin forum: http://www.iconarchi...-by-harwen.html
Click here to download this file
211 downloads
0 comments
Submitted
-
FileZilla window 7
By HyperSpin
FileZilla Client is a fast and reliable cross-platform FTP, FTPS and SFTP client with lots of useful features and an intuitive graphical user interface. Website: filezilla-project.org
Features:•Easy to use
•Supports FTP, FTP over SSL/TLS (FTPS) and SSH File Transfer Protocol (SFTP)
•Cross-platform. Runs on Windows, Linux, *BSD, Mac OS X and more
•IPv6 support
•Available in many languages
•Supports resume and transfer of large files >4GB
•Tabbed user interface
•Powerful Site Manager and transfer queue
•Bookmarks
•Drag & drop support
•Configurable transfer speed limits
•Filename filters
•Directory comparison
•Network configuration wizard
•Remote file editing
•Keep-alive
•HTTP/1.1, SOCKS5 and FTP-Proxy support
•Logging to file
•Synchronized directory browsing
•Remote file search
229 downloads
0 comments
Submitted
-
Game Information Scraping (MobySharp)
By Rain
Recently I had the need to obtain tons of data (as I am creating my own video gaming frontend (no, it's not for new systems; it is for old computers to play DOS games on.)) but there seemed to be a lack of tools out there for us software developers to use. So, my solution was to just simply make my own damned scraper that obtains detailed information from MobyGames. So, here I am after a day and a half of creating this scraper solution and am sharing it with the community in the hopes that I may save some other developer out there the headache and torture of doing this themselves.
The only functionality that I left out of the scraper is the obtaining of images (as most of MobyGames images are sub-par at best anyhow) and all I care about is the detailed data and don't want to waste any of their bandwidth obtaining said images.
The Dynamic Link Library
Using the library is fairly simple and a straight forward process. What I usually do is declare a global List<MobyGamesSearchResult> that is populated later on in the code. The reason that I declare a global is so that I can easily obtain the name of the game, and the MobyGames.com URL for the application URL (later on in the code examples it will become clearer what I mean.)
Setting up your methods
using MobySharp;
using MobySharp.Methods;
public partial class Form1 : Form
{
List<MobyGamesSearchResult> _gameList = new List<MobyGamesSearchResult>();
.....
Now that you have declared all of your variables that you will be using throughout the application we can safely populate our results list by calling a search function.
_gameList = new MobyScraper().SearchMoby(searchString);
if (_gameList != null)
foreach (var results in _gameList)
{
listBox1.Items.Add(results.Name);
}
Where searchString is equal to the name of the game you are looking for (ie DOOM II). You will notice that I also trap a null search result in the code above; as there is currently no method implemented of converting a null search (ie no games found.)
So, now that we have our _gameList populated and have listed all of the search names into a nice tidy listbox we can continue our code as seen whenever the user changes the listbox1 index.
foreach (var result in _gameList)
{
if (result.Name == (string)listBox1.SelectedItem)
{
var entry = new MobyScraper().GameInformation(result.Url);
labelName.Text = (string)listBox1.SelectedItem;
labelPublisher.Text = entry.Publisher;
labelReleaseDate.Text = entry.ReleaseDate;
labelDeveloper.Text = entry.Developer;
labelPlatform.Text = entry.Platform;
labelGenre.Text = entry.Genre;
labelPerspective.Text = entry.Perspective;
richTextBox1.Text = entry.Description;
richTextBox2.Text = entry.AlternateTitles;
return;
}
}
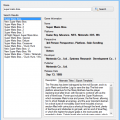
So, as you can see by the code above we first get a search list of all available titles; and an URL is assigned to each title. After we have made a game selection we cross reference the title name against the selected game and if a match is found we extract the URL and then create a new GameInformation object which will contain all of the data on said game.
The Example Application Showing Data
Posted Image
Anyhow, I hope some of my fellow third party developers get some use out of this; I have attached a sample application as well as the stand alone DLL file in this post.
241 downloads
0 comments
Updated


-
Platinum Members Save 25%