Jamie1 Posted July 20, 2015 Share Posted July 20, 2015 After a friend showed me Hyperspin I become very keen to master the programming and build my own arcade, I collect old games consoles so the next logical step was to own my own arcade machine I spent months and months trying to suss out Hyperspin and i'm not going to lie to begin with I couldn't get the simplest things to work, I almost gave up, Then all of a sudden something clicked and it all started falling into place, This is when I decided I wanted to build a Bartop arcade, Something I could easily take to friends houses for parties, I started this project by making a scaled Paper model Just so make sure all the components would fit in, The paper model worked well so I begun my build, I used 12mm MDF for this build as I wanted to make it as light as possible, I first drew out the 2 sides on 2 pieces of MDF. The next step for me to take was the mounting of the monitor in the Cab, I stripped the plastic casing off the front of the monitor and measured the size of the slot I would need to cut out of the MDF for the bezel, I then added the top of the Cab and supports for the back, I’m going to mount the Computer on the back door on hinges so it can be open if I need to work on the computer and then just slips up behind the monitor when closed, I then cut the holes for the speakers and Fans, I wanted to have the fans on each side so I could have a constant flow of air through the Cab keeping it nice a cool, I mounted the Amp on the front so its nice and accessible if needed to be turned up or down. I soon came apparent that the computer I was using just wasn’t good enough for what I wanted to emulate, I decided to upgrade it and start with a fresh control panel also, The layout I had just didn’t work for me there just wasn’t enough buttons for what I wanted to achieve, Now for the fun part! Paint!! i was drawn between black and white, After much thought i went with white, Stupidly i decided to spray paint it, The finish i pretty good but the cost involved with doing it this way was not, i thing all in all tho it came out ok, I went with chrome T-Moulding to finish it off, (not going to lie I see pictures of a white/chrome finish online and instantly fell in love with it) I actually found this step a little difficult, I was unable to find the right size slot cutter so got the smallest I could, The slot was too big for the 12mm T-Moulding I had bought so I used hot glue gun to glue the T-Moulding in place, Really happy with the finish, Then came the really fun part, I decided on a layout and luckily had a birthday which I asked for what every arcade loving guy would, An I-Pac2 and PacLED64 module, Oh and 22 RGB buttons, I spent hours wiring this lot up, I wanted the wiring to look impressive even though it would be hidden within the cab, I have since added Tinted Perspex to cover the screen, I think the finish is good and it doesn't change the quality of the picture too much ,As you can see its not quite finished, I thought I would start a post and see what people think, I have since decided that 12mm MDF wasn’t the best idea as working with it wasn’t so pleasant, And if i’m honest I haven’t really gained much by doing so as it still weighs a tonne and isn’t the most mobile of devices, It has been great fun building it so far and I look forward to getting it finished, would be great to hear what you guys all think, Link to comment Share on other sites More sharing options...
gigapig Posted July 20, 2015 Share Posted July 20, 2015 Very nice. The T-moulding scares me, just the thought of doing it, but you've got to have and love the hot glue gun, everyone should have one. Link to comment Share on other sites More sharing options...
Jamie1 Posted July 20, 2015 Author Share Posted July 20, 2015 Very nice. The T-moulding scares me, just the thought of doing it, but you've got to have and love the hot glue gun, everyone should have one. Thanks! Tbh its not so bad! Just took my time... i will say tho having the slot too big for the T-Moulding probably wasnt a bad thing as it didnt matter that the cut wasn't 100% in the middle, And as everyone who uses a hot glue gun knows its a great gap filler, allowed me to get the T-Moulding spot on.. Link to comment Share on other sites More sharing options...
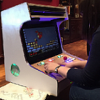
Metalzoic Posted July 20, 2015 Share Posted July 20, 2015 Looks great! Turned out really, really good. What type of joysticks are you using? It also looks like you're almost using a Japanese arcade 8-button layout, but not angled or spaced in the normal way. Did you do it that way so that you could have those 4 buttons in a diamond pattern like a controller? How does it feel? The buttons look rotated counterclockwise enough that it almost seems like you'd need to twist your body left a bit to use them naturally. Just looking at the pic makes my head tilt to the left a bit. Also what are your admin buttons labeled as? Link to comment Share on other sites More sharing options...
Jamie1 Posted July 20, 2015 Author Share Posted July 20, 2015 Thanks Metalzoic! I think they are zippy joysticks. So nothing special. Bought a cheap set when starting the build and haven't felt the need to upgrade them! I searched layouts for days and finally stumbled across this one. I'm not sure if it is a specific layout or not but as you can see it is capable of most controller layouts. Nes/snes. Neo geo. playstation etc etc. I wanted something which would work well with many wheels. In regards to the layout feeling awkward. I've honestly not noticed. Due to the cab only being 500mm wide when playing 2 player you have to squash round abit anyway so it's not ideal then! I've not really played many others. Certainly don't remember doing so so to me I don't know any different. I may have to experiment with tilting the layout to see if it feels any more natural. Sent from my iPhone using Tapatalk Link to comment Share on other sites More sharing options...
Agrajag Posted July 20, 2015 Share Posted July 20, 2015 Nice work! What problems did you have with the MDF? I know most people build their cabs with MDF or plywood and both have their plusses and minuses, but I've never used either (I've made a LOT of things out of melamine faced chipboard though). Sent from my XT1032 using Tapatalk Link to comment Share on other sites More sharing options...
Jamie1 Posted July 20, 2015 Author Share Posted July 20, 2015 Thanks Agrajag, The main problem I had with the MDF was due to its thickness of 12mm, I had to use tiny screws so it didn’t blister out the top and the Bezel was really weak before fitted. Looking back I would have used 15mm MDF purely because my reasons for using 12mm was to keep the weight down but its not the MDF that makes the Cab heavy, Its the monitor/computer/amp/speakers etc, I don’t think I would like to go any bigger than 15mm though as I think it would make it look big and klunky! Matter of opinion though I guess, Link to comment Share on other sites More sharing options...
Agrajag Posted July 21, 2015 Share Posted July 21, 2015 Good point about the screws. The alternative is lots of batons and glue, which makes it nice and sturdy but hard to take apart it the need arises! Link to comment Share on other sites More sharing options...
Jamie1 Posted July 21, 2015 Author Share Posted July 21, 2015 That's a valid point. I didn't actually think of that. Doh! I think I would have struggled to fit it all in with batons I tried to make it as small as possible so I could slip it in the car! Didn't work out so good for me. Mk2 will definitely be bigger so I probably will use batons. Sent from my iPhone using Tapatalk Link to comment Share on other sites More sharing options...
Agrajag Posted July 21, 2015 Share Posted July 21, 2015 I may eventually build a cab of my own. Among the many designs I've doodled, the idea I keep coming back to is separate sections for the monitor, control panel and base that are securely bolted together but can be easily broken down for transportation. Not sure exactly how practical this would be but hopefully I'll work something out eventually. Link to comment Share on other sites More sharing options...
Jamie1 Posted July 21, 2015 Author Share Posted July 21, 2015 I've recently started a new project. I've gutted an Xbox clear. And I'm fitting a mini itx PC inside with wireless Xbox controller dongle etc. should easily run HS up2 psx. Sent from my iPhone using Tapatalk Link to comment Share on other sites More sharing options...
haninhojp Posted July 30, 2015 Share Posted July 30, 2015 hi there really nice your bartop... can you post the diagram or the measures? regards h santos Link to comment Share on other sites More sharing options...
adriano_scorpions Posted August 1, 2015 Share Posted August 1, 2015 Very nice!!! Enviado de meu HM 1S usando Tapatalk Link to comment Share on other sites More sharing options...
Jamie1 Posted August 1, 2015 Author Share Posted August 1, 2015 hi there really nice your bartop... can you post the diagram or the measures? regards h santos Hey Haninhojp. I don't actually have any drawings. I made the paper model to scale measuring the components then just went for it measuring off the model and tweeting it as it going. Ile see if I can get some together... I will be honest tho. I would change a lot of I was doing another... Sent from my iPhone using Tapatalk Link to comment Share on other sites More sharing options...
Jamie1 Posted August 1, 2015 Author Share Posted August 1, 2015 Very nice!!! Enviado de meu HM 1S usando Tapatalk Thanks. Glad you like. Hopefully I will finish it before I go travelling!! Sent from my iPhone using Tapatalk Link to comment Share on other sites More sharing options...
eliseo Posted August 11, 2015 Share Posted August 11, 2015 Very nice, that is so awesome Link to comment Share on other sites More sharing options...
iNTiGOD Posted August 11, 2015 Share Posted August 11, 2015 Very neat!!! Love the wiring job. I'm about to glue together my bartop and yours has given me some great ideas!! Link to comment Share on other sites More sharing options...
potts43 Posted August 11, 2015 Share Posted August 11, 2015 What is the make and model of the preamp? What speakers did you use? I put in a creative labs setup in my cab and now considering what to put in my possible bartop. Ideally I want a touchscreen like my cab for jukebox. It made a world of difference. No mouse required...or use a trackball. Link to comment Share on other sites More sharing options...
Rotgut Posted August 12, 2015 Share Posted August 12, 2015 Nice, man!! Put a light in the top and add a marquee and you will have perfection! Link to comment Share on other sites More sharing options...
potts43 Posted August 12, 2015 Share Posted August 12, 2015 Perhaps two buttons on each side for pinball emulation? Link to comment Share on other sites More sharing options...
Jamie1 Posted August 13, 2015 Author Share Posted August 13, 2015 Very nice, that is so awesome Glad you like it, Its taken alot of time and effort to build, Very neat!!! Love the wiring job. I'm about to glue together my bartop and yours has given me some great ideas!! The wiring took HOURS!!! but the way i see it, Do it good the first time and it wont be a problem later on, Shame no1 sees it really, If you have any questions whilst building just ask and i will see if i can help. What is the make and model of the preamp? What speakers did you use? I put in a creative labs setup in my cab and now considering what to put in my possible bartop. Ideally I want a touchscreen like my cab for jukebox. It made a world of difference. No mouse required...or use a trackball. I bought a set off ArcadeWorldUK, Nothing special but it does the job, i did have it wired off Molex but the computer gave off feedback to the speakers so i now just have it plugged into a 4way inside the cab, Nice, man!! Put a light in the top and add a marquee and you will have perfection! I wish that was all that was required... the HDD recently corrupt so gota start the programming again, but its all fun and games....Pardon the pun haha Perhaps two buttons on each side for pinball emulation? I have thought about this, I have established that i have 2 many buttons for the IPAC and PACLED64 however i think i may just bridge them so 2 buttons would do the same thing, That way it should work.. not tackled Pinball much just yet, Trying to get my main setup working well first! Link to comment Share on other sites More sharing options...
Mobstar76 Posted August 17, 2015 Share Posted August 17, 2015 Awesome job! I was looking to build something similar and was hoping that you could share your plans. It's exactly the same setup I'm looking to build except perhaps a tad wider so I won't bump shoulders with player 2 Thanks! Link to comment Share on other sites More sharing options...


Recommended Posts
Archived
This topic is now archived and is closed to further replies.